There are three primary farming enterprises. These are breeding and
hatchery operations, commercial egg production and broiler production.
Other enterprises that provide supportive services are specialised breeding farms for production of pure lines, grandparent and parent stock, feed milling and processing and marketing of poultry products. In addition products and services are also closely associated with the primary enterprises.
Breeding and Hatching of Commercial Day Old Chicks
This enterprise involves the rearing of parent stock hens and cocks in the
correct ratio to produce fertile eggs, which are then hatched with the use of incubators and hatchers. The chicks so hatched are then sold out to poultry producers who are engaged in the production of table eggs or commercial broilers.
The primary products of this enterprise are day-old chicks. Eggs that are not good for hatching and the old hens and cocks are secondary products. Breeder’s flocks may be egg types or broilers.
Table Egg Production: For table egg product, pullets are purchased from a hatchery and these are then brooded and reared to the age of about five months before they begin laying eggs. The chicks purchased must have been separated (sexed) into male and females prior to sale.
The primary products of this enterprise are eggs, which are sold for consumption. The hens are sold out as spent hens at the end of their laying cycle, which is usually about one year.
Broiler Production: broiler production has the fastest rate of return of all the poultry enterprises. Commercial day old broiler chicks are purchased from the hatchery and reared to market between seven to ten weeks old, when they should be ready for market between 1. 6 – 2. kg each. The broilers may be sold live or processed (fresh or frozen).
Integration Projects: The three primary enterprises are often integrated on large-scale farms. Integration often includes feed milling and product processing as well as other ancillary enterprises. The major advantage of such integrated projects is the reliability of sources and supply of primary inputs. It also promotes the enforcement of quality control measures in the production of feed and poultry products.
Feed Milling: Because feed accounted for between 60 – 80% of the cost of producing meat and eggs and the crucial need for quality controls, most large-scale poultry producers often make their own feed.
Feed milling involves the procurement of ingredients needed to produce feed, grinding, mixing and enclosing in bags.
Line Breeding and Grandparent Stock Production:
The production of pure lines and the different types of parent stocks are highly specialised fields of poultry production that rely on the expertise of well trained and tested poultry breeders. It is extremely critical since in the long run commercial egg and broiler production would phase out if such breeding work is not maintained. Furthermore, it is at that level that the initial selection and breeding for desirable economic traits occurs.
Brooding Management
Brooding is the art of caring for young chicks after hatching. It involves the provision of those factors that are necessary for the survival and rapid growth of the chick. Such factors include heat, light, humidity, ventilation, feed, water and disease control. In Nigeria and indeed most tropical countries, humidity and ventilation can be taken care of by
means of properly designed housing, but heat light, feed and water have to be provided as necessary.
During the first few weeks of the bird’s life (between 0 – 6 weeks) it is usually necessary to provide supplementary heat to keep the birds comfortable. This period is referred to as the brooding period.
Basically there are two methods of brooding:
1. Natural Brooding: This is the method whereby a broody hen takes care of the chicks she hatches, although she can also be made to adopt purchased day-old chicks. The local fowls are suitable for this purpose and some Rhode Island Red birds may occasionally be reliable. A good-sized broody hen can be given as many as 12 chicks in cool weather and up to 15 in the hot season. Natural brooding is only practiced when small numbers of chicks are reared. It is quite unsuitable for a commercial scale operation.
2. Artificial Brooding: This is brooding without the mother hen. It necessitates the use of equipment which provides conditions similar to those of the broody hen, such as adequate warmth, protection against harsh weather and predators. It also makes for proper feeding, watering and disease control. Artificial brooding
is the best method for the commercial producer. It is advisable for the beginning poultry man to try his luck at brooding a small number of chicks. If he is successful, i.e. with less than four per
cent mortality up to eight weeks of age then he can go on to brood larger numbers.
Facilities Required for Brooding and Rearing
A. Housing: Houses for brooding should be such that they conserve heat to keep the room warm. Houses meant for young chicks should be located at least 50m (150ft) away from houses containing older birds in order to minimise the risk of transferring diseases from old to young stock. In constructing a house, it is
important to note the following:
a. Foundation and Wall: A solid and strong foundation is necessary. Digging should be done to a depth of between 0.5 – 0.7m (1.5 – 2ft) or more depending on the nature of the soil. After digging, a layer of concrete should be poured in to a depth of about 10cm (4”). This will form the
basement upon which the blocks will be laid. To minimize the effect of termites, an anti-termite chemical can be poured on top of this basement. For growers and broilers the wall should be half-open sided but for layers the solid wall may be anything between 1/3 – 1/2. If cages are to be used, the solid wall should only be 1/3 of total height to the caves. It is essential to plaster the inner walls. The
open sided portion of the wall has to be screed with 1/2 – 3/4” chicken wire mesh. The total height of the wall need not exceed 1.9m (6’) from the floor to the caves.
b. Roof: Roofing materials such as zinc and alumimum roofing sheets are good for poultry houses. Asbestos is best because it doesn’t absorb as much heat but it is very expensive. Thatch roofing should be discouraged because of maintenance problems, difficulty of clearing parasites
from the house and fire hazards. It is important to provide a good roof overhang of about 0.9 (3ft). This is necessary
to prevent rain draft from entering the house through the open sides of the wall. The roof overhang may be longer
than this on the side of the building facing the rain bearing wind.
c. Doors: Doors should be wide enough not less than 0.9m (3ft). This is to facilitate easy movement of staff,
equipment, birds and manure in and out of the house. A footbath of disinfectant is needed at the foot of each door.
This may be built in at the doorstep or it may be a movable container.
d. Storage Space: Provision should be made in the house for storage space for equipment, feeds and other items that have to be kept in the house. The size of such a space should be about one-tenth of the total size of the house.
B. Equipment: A number of equipment is needed for the supply of heat and light, feeding and watering, manure handling and egg handling. These can be made locally, or purchased from a poultry
equipment dealer. Factors to consider when buying equipment are cost, durability and ease of handling.
a. Brooder Boxes: The use of brooder boxes is necessary to conserve heat within a limited area when lamps (kerosene or electric) are used as source of heat for brooding.
Brooder boxes can be made from wood or metal or may be improvised from thick cardboard paper or wooden boxes.
All brooder boxes should be constructed with holes at the top to provide for the escape of fumes especially when
kerosene lamps are used. A space allowance of 7sq cm per chick under the brooder bow is adequate, i.e. a bow
measuring 1.25 x 1.25m (4 x 4ft) is adequate for up to 400 chicks.
b. Source of heat: Warmth is the most important requirement for the day old chicks once the environment
becomes too cold they can easily die especially when reared in large numbers. Heat for brooding may be supplied through kerosene lanterns, electricity lamps,
charcoal, gas brooders or hot water pipes. Whatever source is used for heating, it is essential to prevent it from direct contact with chicks, litter material and brooder
boxes. Two to three kerosene lamps placed on the floor or two 100 watts bulbs hung at about 20 cm (8 – 10 inches)
above the floor is sufficient to provide heat and light for up to 75 – 100 chicks. A recent report indicates that under Nigerian conditions brooding with kerosene lamps as heat source is much cheaper than other sources although it requires more care (Federal Ministry of Agriculture and Rural Development, 1985).
c. Feeding and Watering Troughs: These are used for feeding and watering the chicks. Feeders maybe longitudinal or conical in shape. A linear feeding space of 2.5 meters (8ft) is adequate for up to 100 chicks from 0 – 4 weeks of age for broilers and from 0 – 6 weeks for pullets.
Such a feeder should be shallow, not more than 7.5cm (3 inches) deep and be placed on the floor. The feeding space should be doubled for broiler chicks from four – 10 weeks and for pullet chick six – 14 weeks. For this age and beyond, the feeder should be about 1.5cm (six inches) deep. This means that 100 chicks would require one
1.25cm (4ft) long feeder up to four – six weeks of age use three of such feeders up to 10 or 14 weeks of age. Beyond 14 weeks of age use three of such feeders per 100 pullets or layers. Feeders should be constructed with lips to minimize feed wastage and fitted with rollers at the open
end to prevent chicks from jumping in and contaminating the feed with their faeces. Feeders may be metallic or wooden. Most waterers are conical in shape. Two, four litre capacity waterers are adequate for up to 100 birds from day old to six weeks of age. They should be used.
Two waterers of 10 – 15 litre capacity may be used for 100 chickens up to 200 weeks and three of such waterers should be provided for 100 birds during the laying period.
Waterers should not be too large since they will be too heavy and tend to waste water. Waterers usually made of metal, glass or plastic materials. In general feeders and waterers are often constructed in two standard sizes, one
for chicks and the other for older chicken, the chick feeders and drinkers are used during the brooding period while the bigger sizes should replace these as soon as the birds outgrow them, usually between four – eight weeks of age, depending on whether they are broilers or pullets. The poultry keeper may find it convenient to improvise his own feeders and waterers. The points to observe in such a case is that the feeders and waterers should be designed to minimise feed or water wastage and to prevent chicks from jumping in to feed or water wastage and to prevent the chicks from jumping into feed or water and contaminating it. For waterers there should be no leakage and it should be easy to wash.
d. Litter Materials: It is necessary to cover the floor of the brooder house with some dry, clean, coarse and absorbent material before putting in the chicks. Such materials is meant to absorb the moisture from water as spillage and chick droppings in such a way that the house is kept dry all the time. The most popularly used litter material is wood shavings, available from sawmills and carpenters’
sheds and usually given free. Other litter material include: chopped maize cobs, guinea-corn and millet husks, chopped rice straw, chopped fry grass, crushed groundnut shells and rice husks.
e. Miscellaneous Equipment: In addition to the list enumerated above, the poultry keeper would need things like buckets, brooms, shovels, wheelbarrow, feed scoops, chicken crates, ropes for hanging feeders, water tanks for water storage, egg laying nests, egg trays, weighing scale
and for big operations, office space and equipment would also be needed. Other equipment may also be purchased depending on availability and need.
Preparation for the arrival of chicks
A. Buying chicks
Day old chicks should be purchased from a reliable hatchery in order to obtain quality chicks, which are very healthy and have the genetic production potential. Place your order well in advance (about six months) and remember to indicate the sex, strain and quantity required. Seek the advice of your nearest poultry/livestock extension officer on the choice of breed and the hatchery.
Some poultry keepers might prefer to buy only starter pullets so that they do not have to brood the birds themselves. Starter pullets at point of lay chicken are not being produced commercially in this country but it is one form of poultry
business that can be very profitable if there is good co-operation between the pullet rearer and the egg producer. Before buying starter pullets, be very such that the producer had done a good job of rearing by going through the records and by physical examination and weighing a sample of the birds to see whether they have attained recommended weights for the breed or variety at that age.
It is very important to be fully prepared before you collect day old chicks. This will ensure that they are properly transported and received at the farm. This increases their survival rate during the brooding period.
B. Brooder House
Get the brooder house ready about three weeks before the chicks arrive. Work to be done include:
1. Making necessary repairs to mend leaking roofs, repairing doors and plastering cracks in the walls.
2. Removal of old litter from the house already in use sweeping, thoroughly washing and disinfections of the house using a suitable disinfectant such as Izal, Dettol, Sanities or Milton.
3. Feeding troughs and drinkers already in use should also be thoroughly washed and disinfected.
4. Making sure that all the necessary equipment have been purchased and are in good working condition.
C. Two Days to Arrival
1. Sweep the house and clean the equipment
2. Put litter on the floor. If the floor is not cemented, put a layer of dry clean sand before putting the litter. Put the litter to a depth of about 7.5cm (three inches)
3. Cover the litter material with rough brown paper or old newspapers. This is to prevent the chicks from eating fibrous materials while learning to eat. The paper may be removed after four days.
4. Assemble all equipment with the brooder box in the middle and the feeders radiating from the source of heat
should be distributed evenly under the brooder box. The water fountain may be set between the feeders but near the
edge of the hover. The whole arrangement is then enclosed by a chick guard of cardboard per about 45cm (30 inches)
high and about 1.5m (5ft) away from the brooder box.
Blocks or any other suitable material can also be used. The purpose of the chick guard is to prevent the chicks from drifting too far away from the source of heat. The guard may be removed back a little every day and then completely removed after 10 days.
5. Test all equipment to make sure that they are in proper working condition.
6. If a half-open sided house is to be used, cover the open sides with plastic sheets, thick cardboard paper, native mats, empty feed bags or any other suitable material.
Brooding Management Practices
Arrival of Chicks
1. About 6 hours before the chicks arrive, fill the drinkers with medicated water, put on the heat source to warm up the room and place feed in the feeders. Some feed may also be sprinkled on the used as feeders during the first week.
2. Transport the chicks as fast as possible from the hatchery to the farm with minimum disturbance and preferably during the cooler part of the day. Ensure that the chicks are adequately ventilated
while in transit, e.g. the chicks should not be up inside the boot of a car while in transit.
3. Collect all relevant information about the chicks from the hatchery of purpose. Have they been vaccinated? Are there any
special management practices to be observed? What is the anticipated growth or production potential?
4. As soon as the chicks arrive, count and put them immediately under the hover. Remove all deformed chicks. Teach the weak chicks to drink if chicks are transported over long distances by road, the addition of glucose (or sugar if glucose is not available) to the drinking water may help to increase their survival rate.
5. After putting down the chicks stay and watch them for the next one hour and observe how comfortable they are. If they spread under the hover, they are comfortable. If they huddle in the center
close to the source of heat they are cold. If the room is too hot, they will move from the source of heat and be pushing up against the chick guard. The heat supply should then be adjusted accordingly.
6. Chicks have a tendency to crowd around corners of the building especially when frightened or if they feel cold. Piling can lead to mortality. It is therefore advisable to round off any sharp or square corners of the house with boards, bricks or jute sacks in order to prevent piling.
Daily Activities
1. During the first week, inspect your flock as early as possible in the morning, as late as possible in the evenings and occasionally at other times to ensure that the birds are comfortable.
2. Remove any dead birds and dispose properly by burial o ruse of a disposal pit
3. Remove mould or contaminated feed and add fresh supply.
Feeders should only be filled about half to two-thirds capacity in order to minimise feed wastage. They should also be placed in such a way that no bird has to walk more than 3.05m (10ft) to get feed or water.
4. Remove waterers and wash properly before refilling with fresh clean water that is fit for human consumption. Use medicated water throughout the first week. The water should be changed
again in the afternoon, if it becomes dirty or refilled any time it is empty. Waterers may be raised on blocks to minimize
contamination.
5. Remove wet litter and replace with fresh and dry litter materials.
6. When kerosene lanterns are used
a) Fill them up only two-thirds full every morning and evening
b) Remove any accumulated soot
c) Trim the wick periodically in order to obtain uniform flame.
7. Fill in the records. For small holders a hard covered notebook is adequate but for large units a number of forms with the
appropriate columns is usually kept for each pan.
8. All corridors and storage spaces should be swept clean and all equipment not in use should be neatly packed in such storage spaces.
9. If abnormal signs are observed, such as decreased feed consumption, bloody faeces, descried activity or droopiness
report immediately to your nearest livestock or veterinary officer.
Periodic Activities
1. Cull birds that are deformed, stunted or are manifesting lack of growth and poor productivity. This cuts down on the cost of feed and also increases the space allowance for the healthy birds.
2. Debeak the birds at three – five weeks old and between 15 – 17 weeks of age by cutting off about 1/3 of the upper and lower beaks. Electric debeaking at about three weeks of age give a more permanent debeaking than old scissors debeaking.
3. Deworm at eight weeks and thereafter as necessary depending on the incidence of re-infestation of the flock by worms.
4. Following the routine vaccination programme recommended for your area.
Broiler Management
Broiler production should be an attractive enterprise for school projects and backyard poultry producers because of its fast rate of return. Within a school term of ten weeks, broiler can be raised from day old to market weight. For the beginning poultry farmer it offers the unique opportunity to acquire basic poultry management skills, which can then be extended to larger flocks and other forms of livestock farming enterprises. Well managed good quality broilers should be ready for market by eight weeks at which time they should be averaging 1.7 – 2 kg each.
Poultry Housing and Equipment
Housing
The most practical system for broiler management is the “All in” and “All out” method whereby chicks are brought into one house at day old and reared to slaughter weight. They are then removed at once; the house is cleansed, washed, disinfected and allowed to rest for not less than two weeks before a new set is brought in. housing designed for brooding only can be use during the cold months in the North but at other times the conventional open-sided houses can be used so long as the recommendation for optimum brooding conditions are observed.
Equipment
The equipment for broiler production are as described under brooding management because the watering chore takes more time than other routines, it is advisable to install and automatic water system. Automatic watering only requires an overhead tank, a pump to deliver water into the tank and the automatic waterers. Once the tank is full, water fills the waterers naturally by the force of gravity. However, it is important to check the watering lines everyday to ensure that there are no blockages.
Poultry Feeds and Feeding
Broiler feeds are high energy, high protein-containing feeds designed to promote rapid growth. There are two types of broiler feeds available commercially. The broiler starter which should be fed for the first one – five weeks and the broiler finisher should be fed from five weeks to
finish. Although both feeds can have the same energy level (300 ME Kcals/kg of diet), the broiler starter should have a higher protein (23 per cent) than the finisher (20 per cent). Studies by Olomu and Offiong (1980) have shown that good quality vegetation protein can be used as
the sole source of protein in finishers but not in starters. Hence there is the need to ensure that broiler feeds contain a good quality to meet the indispensable amino acid requirements. Good quality feed is an absolute necessity for the successful production of broilers and other poultry.
Broilers are usually fed at libitum. The use of artificial lights to stimulate feeding day and night can increase feed intake and promote a more rapid growth. To make feed available all the time means that care must be taken to minimise feed wastage as this tends to increase with such liberal feeding practices.
The amount of feed required to raise a set of broiler would depend on the quality of feed, the duration for which the broilers are kept and the amount of feed wastage. The consumption of starter mash should be between 1.5 – 2.0 kg/bird from 0 – five weeks, while the amount of broiler finisher should be between 3 – 4kg/bird. Table 11.1 summarises the requirement per 100 broilers.

Management Routines: Daily and periodic routines during brooding have already been described. However, broiler production had the following peculiarities: No de-worming is necessary. Check weights weekly by sampling about five per cent of the birds.
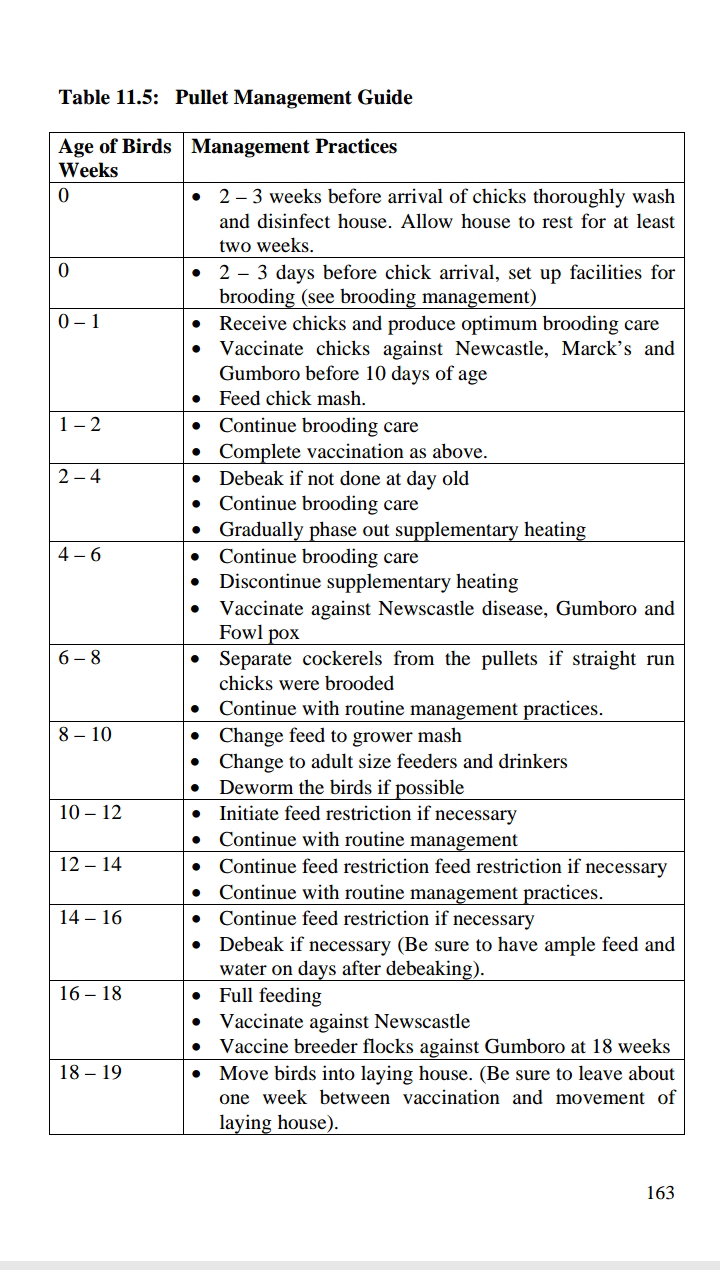
Pullet Management
Pullets are young chickens that are grown to start laying eggs by the time they are 20 – 24 weeks old. The primary goal of the pullet grower is to produce a lean, large-framed pullet that will become an economical and profitable layer.
Housing and Equipment
Housing: Pullets like broilers are most often reared on deep litter floors.
The discussion on housing under brooding is therefore relevant to pullet housing. However, it is important for the farmer to decide whether to have separate brooding and pullet rearing houses or use the same facility to brood, grow and lay. For ease of management, it is better to have a separate house for brooding and rearing. Since it takes four – five months to brood and grow pullets to point of lay, one brood and grow house can be used to produce pullets that will occupy three or four laying houses. For a farm that plans to produce eggs year round, the first set of pullets would be brought in January and be transferred into a laying house in April; the second set begins in April/May which would be transferred into a second laying house in August. The third would be started in August/September, which would be transferred into a third laying house December.
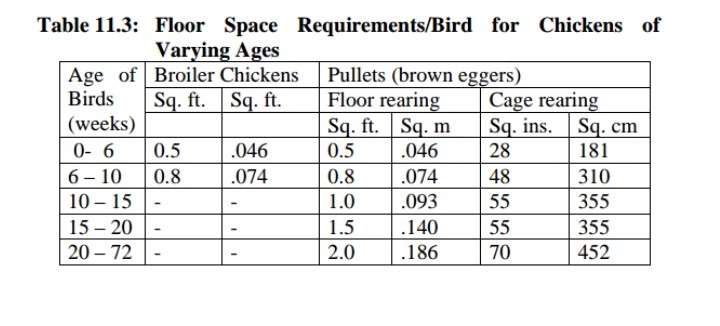
Brooding-grow pullet rearing houses should be designed to give a space allowance of 0.14sq m/bird (1.5 sq. ft). The floor space requirements/bird for chickens of varying ages is given in Table 11.3.
In order to produce pullets that will be economical and profitable layers, great care must be taken to provide the management that will enhance good body development without accumulating fat. It is therefore necessary for the pullet grower to periodically (two weeks intervals) monitors their growth and compares with acceptable growth standards for his breed. It is desirable that 80 per cent of birds weighed must weigh within 10 per cent of the mean weight of the sample because the uniformity of individual weights is just as important as the average flock weight. The sample should be a random selection of about 100 birds per house.
Delaying sexual maturity is often a desirable goal because this helps to
reduce the number of small eggs/bird.
Mortality rate from day old to 20 weeks should not exceed five – six per cent.
Feeds and Feeding
Feeds: There is a tendency to think that pullet feeding is not critical since rapid growth is not a priority; more so that delay in sexual maturity is often a desirable goal. This is an erroneous concept because a badly reared pullet can never be a good layer.
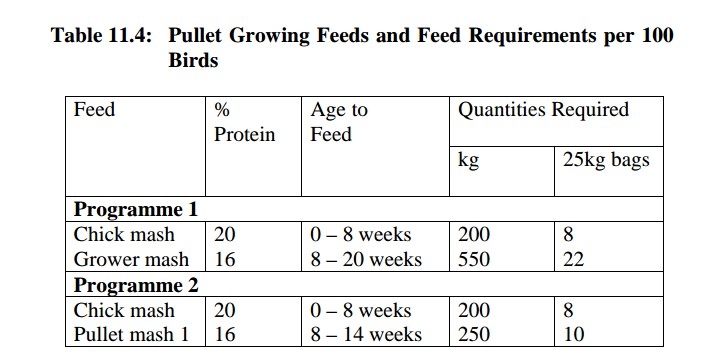
Commercially, growers’ mash is the available feed for pullets from about eight weeks old to between 18 – 20 weeks of age. Chick mash would have been fed fro 0 – eight weeks. However, the present trend worldwide is to have two types of pullet developer ratios, one to be fed
from eight up to about 14 weeks and second from 14 weeks to point of lay. Table 11. 4 gives the feed names and quantities per 100 birds based on the two feeding regimes with no feed restriction.
Feeding Restriction: When pullets are full fed, they tend to mature early and may begin to lay from 18 weeks of age. Most of these eggs would be too small to fetch good prices. It has therefore become a
common practice to restrict feeds for growing pullets the advantages of feed restriction are:
a) It reduces the number of small eggs because the birds produce larger eggs soon after the commencement of lay
b) Trends to reduce laying house mortality
c) It often produces a bird with a larger frame and capacity at point of lay
d) May result in increased egg production
e) May produce significant savings in feed cost/pullet. Feed restriction however, should be practiced only when sample
weighing indicates that the birds are growing too rapidly. One of three methods can be used:
1. Skip-a-day: Full feed for two days and then skip a day without feed. This is the easiest method and it also tends to be less harsh on the birds.
2. Restrict total feed intake: Feed only about 80 per cent of the regular feed intake on a daily basis
3. Restrict the intake of protein or energy: This method can be applied if the farmer mixes his own feeds or is custom mixed.
Although feed restriction is a good management practice for pullets it
must be applied only if a definite need for it has been established. The fact is that most commercial grower mashes are already restricted in energy and protein, this means that further physical restriction of feed intake would lead to excessive feed restriction that will be harmful to the
birds.
Precautionary measures necessary for effective application of feed restriction procedures include the following:
a) Be sure to have adequate feeder space, especially if daily physical feed restriction is adopted.
b) Birds must be properly debeaked as there is a tendency towards increased incidence of cannibalism could be a serious threat.
Debeaking: This is very important pullet management practice which if properly done have the following advantages:
a) Reduces mortality due to feather and vent pecking
b) Decreases egg pecking
c) Improves feed efficiency by decreasing feed wastage
Early debeaking at six – 10 days is the most preferred because chicks are easier to handle than pullets, it prevents the cannibalistic habit at an early age, there is less interference with later vaccinations and there will be greater bird uniformity in the flock. Debeaking may also be done at
four – six weeks and from 14 – 16 weeks.
The debeaking process is a major stress factor regardless of the age of birds on which it is done. It is therefore important that it is done with cold scissors but this often leads to excessive bleeding and high mortality. The best method is to use an electric debeaker. The procedure for debeaking is summarised as follows:
1. Mobilise a sufficient numner of staff for holding the birds and trained personnel for debeaking
2. Work during the cooler periods of the day. If possible avoid debeaking during the hotter periods of the year
3. Work out a system for the most efficient and rapid handling of birds during the process
4. Cut between 1/2 to 1/3 of the upper and lower beaks. Cut sharply and cauterise properly to avoid excessive bleeding
5. Provide plenty of feed and water after debeaking
6. Use anti-stress feed or water additives for about three days after debeaking
7. Do not debeak birds that are already under some kind of stress e.g. vaccinations.
Moving Pullets into laying Houses: The movement of pullets from a rearing house into laying facilities is a significant stress factor. Care must therefore be taken to ensure that the effect of such a stress is
minimal. Movement should take place between 18 – 20 weeks old i.e. before the birds begin laying. This procedure should be followed:
1. Move birds during the cooler periods of the day, best of all in the evening
2. Get the laying facility fully supplied with feed and water prior to stocking. Use anti-stress feed or water additives
3. Eliminating feed 12 hours before moving may be helpful in decreasing pullet dehydration
4. Birds should be handled gently. Scratches or bruises can produce cage layer fatigue
5. Avoid overcrowding. Provide a minimum of 150 sq m. (2sq ft.) of space per bird in the laying house if deep litter is to be used.
Management of Layers
Pullets fed liberally under good management conditions may begin to
lay eggs anytime after 18 weeks of age. However, delaying sexual maturity is a common management practice, which often leads to hens coming into lay after twenty weeks of age. Good layers should attain 50% hen-day egg production by 26 weeks of age.
Egg Production Goals
The profitability of any egg production enterprise depends largely on the number of eggs produced per laying hen. The primary goal of this enterprise is therefore to produce the maximum number of eggs at minimum cost. Under Nigerian conditions a good laying hen (medium
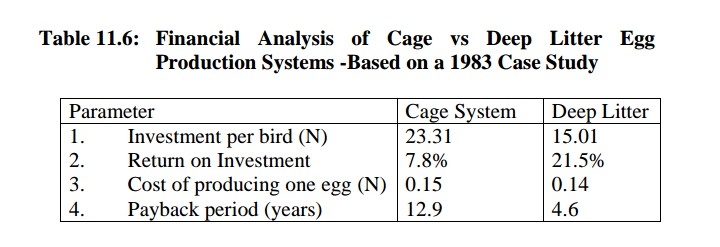
sized brown eggers) should be able to produce about 220 eggs/yr and consume an average of 120g of feed/day. Mortality rates should not exceed about one per cent every month. The financial analysis of cage versus deep litter egg production systems is given in Table 11. 6.
Housing and Equipment
The farmer is often faced with the dilemma of raising layers on deep litter floor or in cages. In both cases solid structures have to be erected, but if cages are to be installed additional expenses must be incurred in the flooring construction to provide for heavier concreting with deep pit.
Both the deep litter floor and cage systems have their advantages and disadvantages
Source: Federal Ministry of Agriculture, Water Resources and Rural
Development, 1985. A comparative analysis of the deep litter vis-à-vis
battery cage.


9 Comments
After a long time, I read a very beautiful and very ismportant article that I enjoyed reading. I have found that this article has many important points, I sincerely thank the admin of this website for sharing it. Best pest control services Frisco Tx service provider.
ReplyDeleteI liked your work and the way in which you have shared this article here about rainwater harvesting system design for us .It is a beneficial and helpful article for us. Thanks for sharing an article like this.
ReplyDeleteI examine your blog site presently share great information right below. Ant Control Abbotsford
ReplyDeleteIt is what I was searching for is really informative. Spot Free Water System It is a significant and useful article for us. Thankful to you for sharing an article like this.
ReplyDeleteYou have done great work by publishing this article here. It is useful and convenient info for us. Keep upgrading our knowledge by share these types of articles.Personal Storage Hyderabad
ReplyDeleteI found decent information in your article about hospital grade disinfectant for salons. I am impressed with how nicely you described this subject, It is a gainful article for us. Thanks for share it.
ReplyDeleteYou've created an excellent essay. Your essay gave me some unique and useful information. Thank you for bringing this article to our attention. termite barrier brisbane
ReplyDeleteI am appreciative of this blog's ability to provide information on such an important subject. I discovered other segments here, and I'm excited to put these new instructions to use. longview professional roofing contractor
ReplyDeleteA very delightful article that you have shared here.Pallet Slip Sheet Your blog is a valuable and engaging article for us, and also I will share it with my companions who need this info. Thankful to you for sharing an article like this.
ReplyDeleteComment